Windows 7 Virtual
WiFi Router
You
can create a WiFi hotspot for WiFi Reverse Tethering for WiFi supported mobiles
and other wifi enabled computer to create a network and to share internet.
Convert
your PC into a WiFi hot spot for free.
Download
Link:
Works on
Windows 7 and Windows 8
Pre-Installation
Requirements:
v Microsoft .Net 4
framework
v A pc with wifi card
which supports virtualization
How to know if your
PC Supports WIFI Virtualization?

Start > CMD
(enter) then type this : netsh wlan show drivers
Look for the Hosted
network supported : If Yes, it is supported but If No, Sorry.
Configuring the first time | FAQ


Configuring
for the First Time
Instructions
to start using it
1. For now we are releasing for only windows 7.
2. If you don’t have .Net framework installed on your
machine , enable Microsoft .net from "Turn on Windows Feature On or
Off" option, To do that Open Control Panel and follow the following steps
to enable it.
3. Press "Programs" or "Programs and
Features"
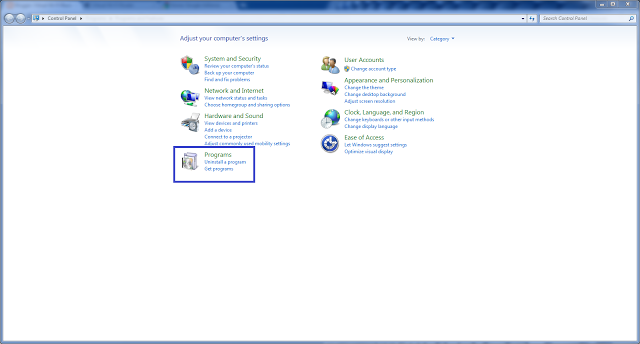
4. Press "Turn windows feature on or off " as
shown in the below image

5. Select the check-boxes in "Microsoft .Net
Framework 3.5.1" as shown below and press Ok button

6. Run the downloaded "VirtualWifiRouter.exe"
(Either version 1 or 2)
7. If you are configuring for the first time go to
Configure tab
Enter your own access point name which you want
Enter a password of at-least 8 digits
Re-Enter the password and press "Setup Hot
Spot" button. (Passwords are not stored by the application any where. Once
the wifi hotspot creation is done the credentials are given to Windows and it
will take care of it. We will clear the old password)
8. If you have already configured you need not worry
about configuring again unless you want to change access point name or
password.
9. Once configured if you want the same access point
and password just press start button virtual wifi will be created and waiting
for connections.
10. Once it is started you can minimize it to tray and
work on it from system tray.
Steps to be
followed for Virtual WiFi Router For Sharing Internet Connection on the newly
created Virtual Wifi Adapter
Even you can check this Microsoft link.
To share the internet connection on this wifi please
follow the following steps :
Right click in the location shown in the image

Select "open network and sharing center"

Select "Change adapter settings" as shown in
the above image
Right click the interface which has internet. Select
Properties
Eg : "Local Area Connection" or some usb
internet dongle interface.
Go to "Sharing" Tab
Select the check box as show in the figure and select
the newly created wifi adapter.
if you see any warning press ok button.
Disable and enable the both adapters connect to your
internet on pc normally

Download Link:
You're Done!


0 (mga) komento :
Mag-post ng isang Komento